TECHNOLOGY IN ACTION - ASSIGNMENTS
Final Project - PART 1 DUE TUESDAY
There were a lot of excellent ideas shared by all of you today. While one agreed upon story did not quite emerge, several groups have organically formed based on shared interests, which is great - dig deeper into these. Some of you are thinking what to do solo. Once your work is shared next week, we will find ways to connect all of it together, and how we transfer and transition from one to the next.
Overview:
We have explored various tools, technologies, and themes throughout the semester:
- Mars Point A to B (objects and performance)
- Websites
- Graphics
- Soldering (leds)
- Animation (gifs)
- Pictograms (stages of life)
- Laser cutting and toy design (+mechanism)
- 3D printing and 3D scenes
- TouchDesigner and Interactivity
- Projection Mapping
- Sewing
Assignment:
Each of you needs to create a final project that is a deep dive into several of these areas based on your interests. START RIGHT AWAY. For next Tuesday you should have a working prototype, ready to show. If you formed a group you still need to each create your own project that can stand on its own, which could then be combined with others in your group.
If you are still looking for ideas, perhaps take inspiration from the New Museum exhibit, which aims to explore "what it means to be human in the face of sweeping technological changes".
Schedule:
- Tuesday April 21 - Bring your project to show and work on - should be a working thought out prototype
- Wednesday - Studio time + making group connections
- Tuesday April 28 - Project progress to show and work on
- Wednesday - Studio + Groups work on transitions
- Tuesday May 5 - Final show
Performance Time:
Your individual project performance presentation should be approx 90 seconds max.
Group presentations can combine the times for a longer performance
Let us know if you have any questions or need any kind of help!
Week 11 - Due Tuesday April 14th
PART 1
Following our visit to the New Museum's New Humans: Memories of the Future exhibit:
Choose two artworks by two different artists in the exhibit. Take pictures of the work and complete the following for each of them. Upload all into a new page on your website:
- Name of the artists and of their work
- Date - when was it made
- What technology is being incorporated
- How is technology being used - describe this in detail
- What materials is it made of? - be very specific and detailed
- How does it work? What do you not know? What is invisible? Describe in detail
- What made you pick this? How is it interesting or inspiring to you?
- Draw the artwork (literally) - create a "technical" drawing of the artwork.
- Sketch/draw how you think it works (what changes over time? what is the flow of information/movement?) (conceptual)
PART 2
Record out a TD video showing a warping of reality/self. What is real? How do we bring the physical into the digital and what affordances do we have there that we don’t have IRL? What can that communicate? How can we represent objects or people in ways that we can’t physically? At least 12 seconds, can just be a screen recording.
- File In POP
- Geometry COMP, Camera COMP, Light COMP, Render TOP, Phong MAT
- MovieFileOut TOP
Advanced:
- Camera Movement "looking at" a Null COMP
- Changing Light Color and Intensity
- Multi-cam set ups switching between renders
- Copy POP to make a bunch of repeating model patterns
- Animate with an Animation COMP or CHOP (like LFO, Ableton, etc) -- video on YT "Chop Animations"
- FBX Animation — TPose hack into positions
- Timer CHOP to automate the Recording
Walkthrough video on Notion page and Youtube Channel
Artists for Inspiration:
Week 10 - Due Tuesday April 7th
PART 1
- Using a sewing machine + hand sewing + any other sewing technique, embroidery, knitting, or a combo of all, create some kind of stuffed 3-dimensional object. It can be a doll, machine, puffy quilt, sculpture, fashion accessory, apparatus, or?? what else?
- Be thoughtful with your choice of fabrics and shapes
- Take pictures and upload to your website with a description of what you made and what it's called.
- Bring it and be prepared to present in class
PART 2
Bring in an .obj of an object, an .fbx of a character with a mixamo animation, and a .ply of a scene/splat
- Mixamo Walkthrough Video from Class
- RealityScan to Mixamo Walkthrough
- Scans — make sure you have:
- An object from Reality Scan
- A person rigged and animated from Mixamo
- A space you scanned with Luma 3D Capture (or another app that generates point cloud files).
Week 9 - All Due Tuesday March 31st
PART ONE:
Design an original design in TinkerCad (simplest), Blender or Fusion 360 and 3D print it. Instructions for our Ultimaker and Bambu 3D printers are HERE. It can be anything:
- Jewelry, Pins, Keychains
- Several printed small pieces that can be put together and arranged into an art installation, perhaps inspired by the artists Nancy Holt or Tara Donovan
- Mini sculptures, Mini utensils, Mini playground, Mini food, Food+utensils
- Abstract objects that are put together to form something.
- etc etc..?
BRING IT TO CLASS + DOCUMENT AND POST IT ON YOUR WEBSITE
PART TWO:
- Inspired by the utopian vision of Bodys Isek Kingelez, design a fantastical 3D utopian scene or room or structure and all of the objects inside it. (in class we suggested creating a crime or love scene). IT MUST TELL A STORY. Be imaginative and comprehensive with the possibilities this 3D tool offers.
- Avoid using the preset shapes, and do not copy paste from other designs - it defeats the purpose. Instead, create them yourself by combining, grouping, resizing and manipulating basic shapes.
POST ALL OF THE ABOVE ON YOUR WEBSITE. WE'LL REVIEW THEM IN CLASS
Week 8 - Due Wednesday March 25th
Lighting Assignment: The idea with this assignment is to practice doing this again and experiment with cues, colors, brightness, fade ins/outs, no fades, etc. As shown in class, doing this on your laptop is the equivalent of programming the actual board. You can then copy your file and load it on the lightboard in 404 and operate the lights in the room.
Using the ETC EOS software that you all installed on your computers, create a light show that includes:
- 12 different cues that incorporate various lights on the 3d grid
- Different colors for each
- Different Fade in/out times
- Zero second fades for sharp cuts to a new cue
- Incorporate the moving lights in at least one cue
- What else can you do?
- Google anything you're wondering how to do or ask me (for example how to change fade time)
- Play your light show to test it
- Screen record it and upload to your website under a new week
- If you like, copy it to the computer in 404 and test it out in the room!
The tutorial is up HERE (updated since we did it in class. no need to do BASE for moving lights). You'll want to start from HERE if you need to download the software. And you should ALL download the new LIGHT TEMPLATE which we updated.
Week 7 - Due Wednesday Mar. 11th
In groups of 4, create a performance that uses Ableton to control audio-reactive projections in your environment and on a constructed prop/set.
Criteria:
- Projection Map with TouchDesigner on both:
- something in the environment, a pre-existing structure / part of the room / on the 4th floor.
- something you've built for this, a constructed canvas that thematically fits with the narrative of your performance and is designed to be a clear projection surface.
- note: still aim for something flat since we haven't gone over how to adjust your content to match 3D.
- Have a performative element (whatever this means to y'all, could be a skit, a dance, a concert, etc.)
- Create an original score in Ableton and use the techniques we did for last week's assignment to control your projected visuals automatically via your music.
Note: not all projectors work at all distances, so make sure you know which projector is best for your concept. Either test them or there's a chart at the top of the Notion.
Your group can check out a projector from the ER — Don't wait until Tuesday to do this!
Week 6 - Due Tuesday Mar. 3rd
Make audio reactive visual art in TouchDesigner using Ableton to automatically control your media.
Detailed walkthrough videos are on the Notion link below — going through what we did in class, plus a few extra techniques.
- Use a simple TouchDesigner node network to create a visual that uses audio signals to change between assets or modify what we see on screen.
- A basic version of this could be:
- Take four frames of an animation you drew in Photoshop
- Load those images with MovieFileIn TOPs
- Connect those TOPs to a switch TOP
- Drag the beats channel of your Ableton Song component to the "index" parameter of your switch TOP
- And now the image will automatically cycle between your frames on each beat.
- Use TDAbleton to send signals between Ableton and TouchDesigner.
- The Song/Track components let you access beats and bars that can cycle your switch TOPs, or let you access meters/levels of individual tracks in Ableton, so you could have effects in TD synced to your guitar, vocals, drum, etc. tracks.
- The MIDI components send over MIDI notes that can trigger events in TD, like having a certain color or image show up every time the kick drum note is sent.
- The Effect Rack components send over macro data, so that turning a knob on a filter/effect in Ableton can also "turn a knob" in TD at the same time. For example, as you turn the overdrive effect's dry/wet up, that also changes the slider on your cross TOP to blend between a normal image and a weird, distorted version of the same image.
- You can get as fancy as you want to in Touch; if you're bored by what you made, that's a sign to go deeper. Check out the resources on the notion page, or search youtube/insta/tiktok for inspiration.
- Imagine you have synesthesia, with sound creating colors in your mind — what colors would your song make if it could? How do your eyes see the world around you when you're listening to the music?
- Do you have a music video already for a song you wrote? Load the video into TD (same as loading an image) and use the song's levels + TD filters to add extra effects to the music video.
- Does the music make you want to dance? Use the VideoDeviceIn TOP to get a webcam/phone livestream, then add effects to it that dynamically react to the music, just as your body dynamically reacts to it.
- Take a screen recording of your audio reactive visual in action and upload that along with your process notes to your Website.
Video Walkthroughs and Resources:
And don't forget you can right click on a node in Touch and select "Op Snippets" to see an example of how any TOP works!
Week 5 - Due Wednesday Feb 25th
START DESIGNING - THIS WILL TAKE TIME
Design, laser cut, glue, paint, and put together a 3-dimensional object or toy that incorporates at least one moving mechanism.
- In Illustrator create a new Artboard that is 12 inches by 12 inches.
- Create your design utilizing as much of the 12x12 artboard as possible (leave about 1/4" from the edges). NO GENERATIVE AI OR FOUND IMAGES - it totally defeats the purpose of the assignment.
- In the Art Studio there are 12"x12" plywood pieces 1/8" thick. USE JUST ONE PLEASE.
- FOLLOW this LASER CUTTING TUTORIAL
- NEED MORE WOOD? Use cardboard, or thick paper.
- GLUE your pieces together to create your new 3D objects.
- PAINT everything so it no longer looks like it was lasercut.
- FEEL FREE to incorporate any additional materials that would enhance your object such as fabric, beads, LEDs, wire, wooden dowels
- EXPERIMENT - The laser is precise and can cut out shapes that would be incredibly difficult for you to cut by hand - use that cleverly to your advantage.
WEBSITE:
Create a page on your website and UPLOAD final pictures, documentation, NAME OF TOY/OBJECT, description (what is it and what does it do), and your Illustrator AI file to your website.
WE WILL HAVE A PERFORMATIVE EXHIBITION ALL TOGETHER ON WEDNESDAY FEBRUARY 25TH
Also make sure you have TouchDesigner downloaded and ready to go on Tuesday ~ * * *~ `*
MECHANISM EXAMPLES:
GEAR SET EXAMPLE: Illustrator File
Week 4 - Due Wednesday Feb 18th
Inspired by Saul Bass, Keith Haring, making the ordinary extraordinary, olympic pictograms, international symbols, etc:
In ILLUSTRATOR ONLY create a series of FIVE infographics/pictograms that tell a story about the stages of your life so far. This can take on many forms.
- Upload your FIVE pictograms to your website.
- For each pictogram include its name and a description.
- Be ready to present/perform your stages for the class.
- SPEND TIME EXPERIMENTING WITH ALL OF ILLUSTRATOR'S TOOLS, SHAPES, LINES, COLORS, EFFECTS, TEXT
Week 3 - Due Tuesday February 10th
Complete your website design and Mars Project documentation.
Using Photoshop, and incorporating what we learned in class + your own experiments - create a 6-panel short story (children's book, experimental, educational, comic, etc..)
1 cover page with title graphics etc
5 pages of the story
Incorporate and experiment with animation + GIF making - create moving elements in each of your pages using frame or video animation in the Photoshop timeline.
USE THIS OPPORTUNITY TO EXPERIMENT WITH PHOTOSHOP's IMAGE MANIPULATING CAPABILITIES - IDEALLY YOU WILL USE PHOTOS, IMAGES AND ART THAT YOU HAVE TAKEN OR MADE YOURSELF.
What is your style?
What is your inspiration?
What colors, text, imagery, or art will you create?
What importance will the movement in your work have?
Use this opportunity to experiment with telling a story using visual/graphic/text elements.
Upload your work on a new page on your website, as Gifs, images, and/or videos. If you like try incorporating a soundtrack or sound effects onto your webpage to accompany your story.
Here is a tutorial on how I created the animated triangle above in Photoshop. It's probably easier in programs like Procreate, but if you only have Photoshop you can try this.
Week 2 - Due Tuesday February 3rd

Using everything you've learned and experimented with so far in Cargo, design and build your website. Your site is meant to be an experimental art canvas for expressing your artistic vision online, a visual storytelling platform, and as a space for uploading your weekly assignments.
Remember - you must create everything you put on your sites and it must be your own new and original work.
You know how to:
- Display text, links, images, videos, GIFs
- Play with color, size
- Draw, photograph, sculpt, make sounds
- Incorporate sound files and video mp4 files
Use this knowledge and your imagination to develop a unique vision for your site - what story will it tell? How will visitors interact with it?
- Create a unique main page.
- Create a "menu system" with links to the 14 weeks.
- Upload your first week Mars projects to a new week 1 page with project name, images, sketches, performance video, and project description that describes: what is it, what does it do, and how does it do it
- anything else you'd like to include.
MAKE SURE YOUR WEBSITE LINK ON THIS DOC IS CORRECT!
Week 1 - Due Wednesday January 28th
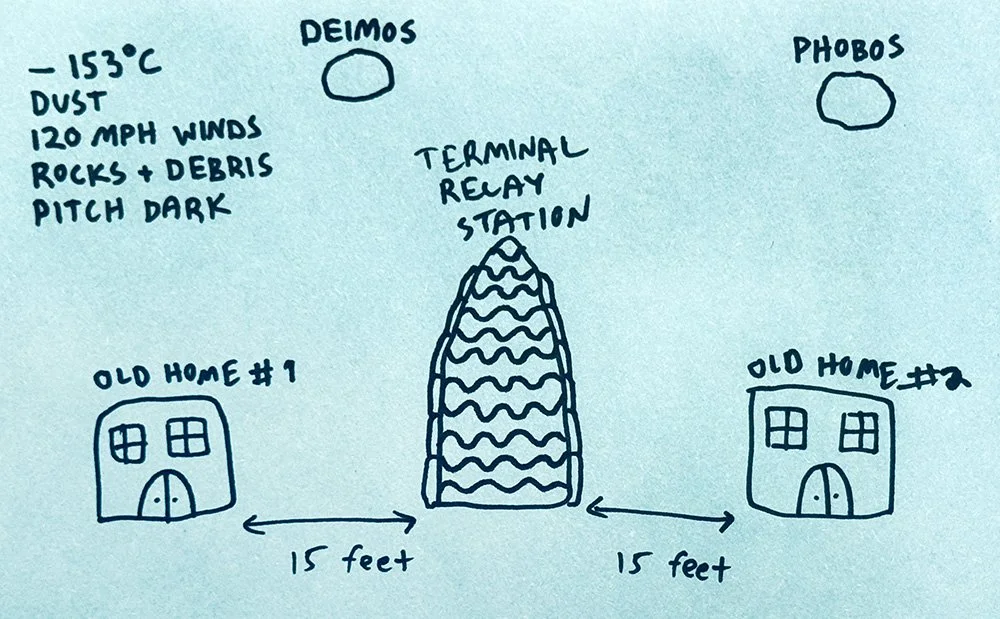
The year is 2089. You live in a home for old people on Mars. You wake up in the morning feeling rhapsodic and youthful. You dress up, brush your hair and apply your face cream. You feed Becky, your tri-color Bassett Hound three strawberries and a teaspoon of milk.
You share Becky with your ex who lives in OLD HOME #2. After a long custody battle, you settled out of court and arranged a schedule that makes sense for all three of you. Today is exchange day.
"This is going to be a good day," you say to Becky, and kiss her on the nose.
The breakfast menu flashes on your bedroom monitor: PANCAKES
The exchange of Becky takes place at the TERMINAL RELAY STATION which is located halfway between Old Home #1 and Old Home #2.
The good news: The Terminal Relay Station is outside and only 15 feet away.
The bad news:
- The temperature outside is -243°F (-153°C)
- There is a dust storm with 120 mph winds carrying rocks and spatial debris.
- It's pitch dark except for the light from Phobos and Deimos, Mars's two moons.
- You have to be back for Breakfast (you cannot skip even one meal) so you only have 2.5 minutes to do the exchange and come back safely.
Build a small model of a device, machine or contraption that will take you from either OLD HOME #1 or OLD HOME #2 to The TERMINAL RELAY STATION to exchange Becky. What does your outfit look like? What sensors do you need to survive the outside climate? What futuristic technology will you put to use to survive the short but tumultuous journey? And how will you make it in less than 3 minutes back and forth so that you can each get back for breakfast?
Good luck.
On Wednesday you will randomly be paired and come up in front of the class and present / perform your project. Make it into a story and consider incorporating other elements such as light and sound.
NOTE: all work you make for TIA must be new and original. Music, sounds, images, objects - should all be made entirely by you.